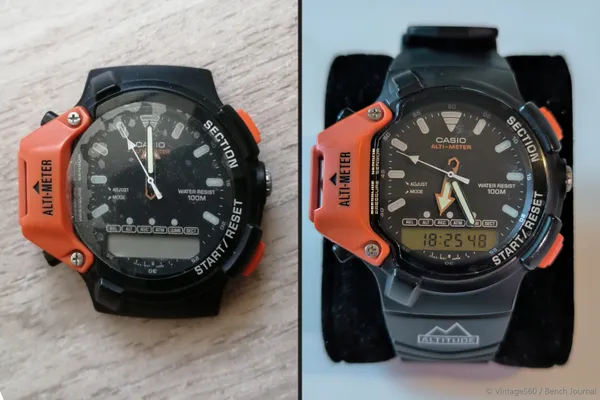
Resurrecting a Forgotten Classic: The Casio AW-330-AT
From an online auction gamble to the Austrian Alps: the complete step-by-step revival of a rare 1990s altimeter watch.
I often browse auction sites; I’m mainly interested in old analog cameras. From time to time, though, I also search for watch brands (Seiko, Casio, etc.) to see if I can find a rarer, more interesting model. It was during one such search that I came across a Casio AW-330-AT watch. I own a few Casio watches (Duro, AE-1200, SGW-100), and I’m also familiar with the brand’s more iconic models. This watch, however, was new to me. Since I always enjoy watching YouTube videos showcasing unique Casio watches, this one piqued my interest, so I figured I’d take a closer look.
Auction and Bidding
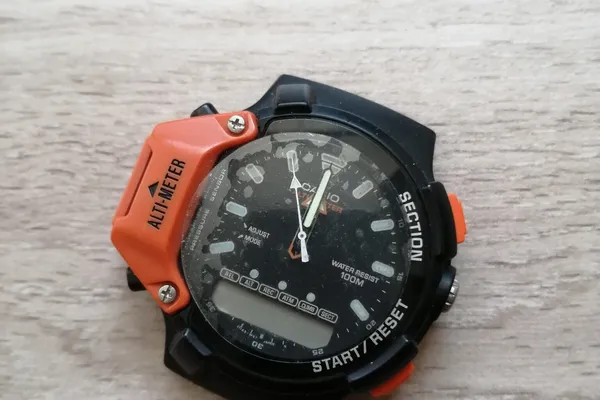
The listing included 9 high-quality photos, which immediately revealed that the watch didn’t come with a strap, but it did have a screen protector and was in good external condition.
Unfortunately, it also quickly became clear from the photos of the interior that something had happened to the watch — either it had gotten wet or the battery had leaked. These observations were confirmed by the ad’s text:
“For sale in the condition shown in the photos: a Casio AW-330 men’s quartz watch with an altimeter, in nearly new condition. I know nothing about it — please buy with this in mind! No warranty.”
From my experience buying analog cameras, I know what it means when a seller “knows nothing” about the product they’re selling. All right, let’s take a look at the price then. The starting bid was 500 HUF (~$1.40); when I found it, it was at 1,600 HUF (~$4.50).
I liked the watch’s design — the combination of digital and analog elements, the orange and black colors — and I thought the large altimeter sensor protruding from the watch case was really cool. No matter how much I like something, this is when I need to do a little research to figure out exactly what it is that appeals to me. What can be found out about it, how rare it is, and what its current market price is. After a quick search, I found the following description:
Based on this, we’re talking about a watch that’s a good 30 years old, so the fact that it’s remained in such good condition is good news.
Let’s look at the price, then. In a similar color with a strap, in its original box but without papers, it goes for about 80,000 HUF (~$220) on eBay. I’ve also found elsewhere that “New Old Stock (NOS)” pieces in excellent condition can sell for as much as 100,000 HUF (~$275). Based on this, even if the watch in the listing doesn’t work, it might be worth buying for around 2,000 HUF. At most, I’d take a look at it and resell it — that was the plan.
But by the time I went back to bid, the current bid was already around 2,500 HUF. At times like this, you have to step back, because a bidding war isn’t easy on the wallet, and bidding out of pure emotion is never a good idea — I already knew that from experience. In the end, I decided to set my limit at 5,000 HUF (~$14), and I was confident that because of the internal damage, others wouldn’t bid so boldly — even though it was a rare piece.
I placed my maximum bid two minutes before the auction ended, and then I received two emails: one notifying me that my automatic bid of 2,700 HUF (~$7.50) had been outbid, and the second confirming that I’d won the watch for 4,150 HUF (~$11.50).
Hooray — I’d bought a ~30-year-old watch without a strap and with visible internal damage.
I paid for the watch and the shipping, and all I had to do was wait.
Preliminary Research
I like to be prepared when it comes to what I’m buying, so I started looking into the watch more thoroughly. I wanted to at least be able to read the user manual by the time the package arrived.
I was pretty surprised that I couldn’t find it online. Well, then at least I wanted to know what kind of battery it takes so I could test it out. Maybe I was looking in the wrong places, but I couldn’t find any information on that either. It’s pretty frustrating when that happens, so I thought an AI research tool would give me the answer. I got an answer, but I was sure it wasn’t the right one. Then I stumbled upon some eBay listings and Instagram posts, so I had two leads to go on. The eBay listing included a page from a Casio catalog, and at the bottom of it I found what I was looking for: SR927W x2.
While I was waiting for the watch to arrive, I continued my search for the manual and came across a website where you can download old user manuals in multiple languages. There, based on the module number (734), I found manuals in English, German, Norwegian, and Swedish. I downloaded the full English and German versions, as well as the cover of the Swedish one, because I found it interesting. I combined them into a single PDF and saved it for future reference.
I also double-checked the battery type for the watch in the manual, and it matched.

Which battery is the right one?
The watch arrived shortly after, and upon unpacking it, there were no surprises — it was in the same excellent cosmetic condition as shown in the photos.
I quickly searched for a battery for it in an online store, but due to the shipping time, I decided instead to go to a local old-school watchmaker. I took my list with me, which listed the different names the battery goes by across various manufacturers (Varta, Renata, Energizer 399, Duracell V399/D399, SR57, SG7). I don’t want to go into the details of the unpleasant conversation, but the gist of it was: why didn’t I bring the watch with me, and if I didn’t know whether the watch worked, why didn’t I have an experienced watchmaker test it to save the cost of the battery? In the end, I bought two batteries from him at 2,480 HUF (~$6.90) each; the two together came to 5,000 HUF (~$14).
Interesting — I probably didn’t come across as very likable. This ended up costing more than the watch itself.
Just for comparison, if I’d ordered the same battery from an online store: 3,780 HUF for 10 pieces, so 378 HUF each, but even buying them individually at 420 HUF each, including shipping, it would have come to 2,830 HUF. I went home, unpacked it, and then noticed something I hadn’t seen in the store. The model number of the one I bought is: muRata 399/395 SR927/W/SW. What do the “W” and “SW” designations mean? Let’s look at the difference between the two types:
SR927SW (395): This is a low-drain (SW) battery that delivers a steady, continuous, minimal current to traditional analog watches.
After a quick search, I found the following: if you insert a lower-current SW battery into a watch with high power demands, the watch will function, but the battery may drain faster, or the functions (e.g., backlight, alarm, stopwatch) may be weaker. The reverse is technically possible, but not recommended, because the internal design of high-drain batteries can lead to faster discharge or, in rare cases, a risk of leakage.
What about the muRata batteries I bought? According to the description, this is a high-drain multi-drain type, and it’s compatible with both variants; it also handles high energy spikes properly. Great — at least I don’t have to worry about that, since I spent so much money on them.
Initial Assessment
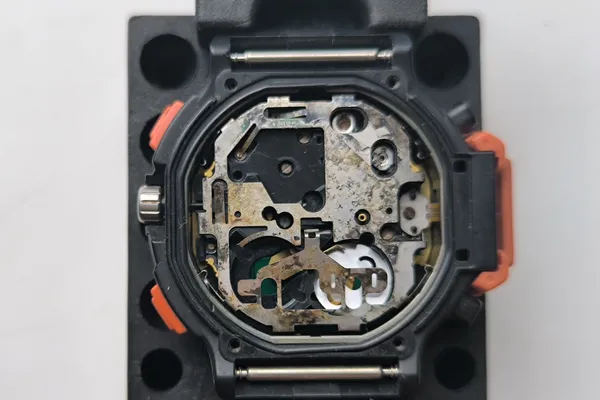
The moment had finally arrived, and I removed the case back. The first thing I noticed was that there were indeed serious problems inside the watch.
Either water had seeped in — which would explain why the O-ring gasket was no longer sealing properly because it had shrunk — or maybe the battery had leaked. I didn’t think about it for long — I was already very curious to see if the watch would show any signs of life, so I quickly snapped the batteries back into place. And nothing happened. Neither the LCD nor the analog hands started working, and I didn’t hear any sound coming from the watch movement.
At that point, I figured the metal parts were so dirty that I’d have to clean them. I dug out the isopropyl alcohol, soft-bristled toothbrush, and cotton swabs that had already proven useful for cleaning my camera. I began methodically cleaning the metal parts — at least the ones I could reach — by spraying a small amount of IPA onto the cotton swab. The crown and the cable leading to the altitude sensor were still holding everything together, and I definitely didn’t want to take either apart.
During the hour and a half of cleaning, the discoloration came off the metal, but not to the extent I’d expected. I figured it was probably more a case of chemical damage caused by a leaking battery rather than water damage. The acid had nicely eroded the thin anti-corrosion layer, so no matter how much I cleaned, I couldn’t get rid of it. But I still hoped that I’d at least managed to remove the dried-on layer of acid and oxidation from the leaked battery, as indicated by the brownish/yellowish/grayish tips of the cotton swabs. I reinserted the batteries, but unfortunately, still nothing.
After a little research, I found that the problem might simply be that I need to perform an All Clear (AC) reset. I learned that this resets the watch’s IC to its default state, removes any residual voltage, and clears any erroneous commands remaining in memory.
How to perform? Touch the point marked “AC” with one prong of a pair of tweezers, and touch the battery’s positive or negative terminal with the other prong for 2–3 seconds.
This seemed promising; my only problem was that the markings on the metal plate were barely visible. So I cleaned a little more where I thought I saw markings, then took close-up photos. Unfortunately, I could barely make out anything in the photos, so I used AI to help me identify the “AC” marking; all that was left was to find the corresponding point.
After examining the movement for a while, I had a pretty strong idea of which point was most likely the AC point. To the left of the label, moving upward from the bottom-left pusher, there’s a gold-colored dot. I grabbed my tweezers, touched one end to the suspected AC point, and the other to the metal above the battery compartment, where the “UP (+)” label is also visible.
Nothing happened this time either, so the problem must lie elsewhere, I thought.
Out comes the multimeter
After taking a closer look at the battery compartment after removing the batteries, I noticed a white, round plastic disc at the bottom of the right-side battery compartment. Based on the cutouts, I figured it must be positioned in a specific way so that the battery’s lower negative terminal would only make contact with the metal at certain points.
I did a little research and found out that this small piece of plastic actually serves as an insulator. I tried repositioning it at the bottom of the battery compartment so that the protruding metal there would only touch the battery, just in case there was a contact issue. These attempts were unsuccessful. Is it possible that the left battery compartment is missing an identical insulating pad? I don’t know, but it was time to break out the multimeter.
I started with some continuity tests. First, I checked the clip to make sure it was actually conducting; there was no problem there. Then I performed the following tests with and without the batteries installed, with the following results:
- Test 1: bottom of each battery compartment and the upper metal structure: no beeping → no short circuit between the negative and positive terminals
- Test 2: bottom parts of the battery compartments: no beeping → theoretically, these should be connected
- Test 3: AC reset and upper metal part: no beeping → so the AC reset won’t work either?
- Test 4: Upper metal part at several points: beeping → so the cleaning was mostly successful
- Test 5: bottom of the right battery compartment and edge of the left battery compartment with batteries removed: beeping → so they are connected after all, just not the way I thought in Test 2
Since I’m not exactly an electronics guru, but I’m good at figuring out how things might work, I decided to skip further multimeter measurements for now. I knew it had something to do with this little insulating disc; I just had to figure out what it was. I searched online for pictures of the inside of this type of watch, and in most of the photos, the disc was perched at the bottom of the right-hand battery compartment. In some cases, it was missing and had been replaced with something else. As I looked at more and more pictures, I noticed that the cutouts on the insulating pad lined up with the cutouts in the metal on top of the battery compartment. If the round cutouts in the middle are aligned vertically, then the insulating pad has two tabs on each side, while the metal has two cutouts on each side.
What if the insulating pad’s tabs fit into the cutouts on the metal from below, securing the insulating pad so that the battery’s positive terminal does not come into contact with the metal? In that case, only the top of the left-hand battery (+) would be in contact with the upper metal piece, the edge of which is connected to the bottom of the right-hand battery (-), while the top of the right-hand battery (+) would not be in contact with the upper metal piece. But if that’s the case, then this insulating pad is depicted incorrectly in most of the images found online. My theory was definitely worth a try, so I painstakingly slid the tabs of the insulating pad from below into the holes in the top metal plate. I performed the AC reset, then turned the watch over… and lo and behold, a few segments appeared on the LCD display, and the second hand started twitching in place.
Needless to say, this was a huge step forward; I finally saw a realistic chance that the watch was fully functional — or at least could be made to work.
Reviving the Analog Movement
The next step was to pull out the crown and turn it over and over again. In some places it turned smoothly, while in others I felt some resistance at first, but the more I kept turning it, the smoother it became.
In the end, I turned it back and forth for at least 48 hours to get the entire analog movement moving smoothly again. Since the LCD would occasionally go black, I took a closer look at the metal part above the batteries and realized that it needs to be pressed down to stay in place; otherwise, it won’t press down on the batteries and there won’t be a connection. Fortunately, I was able to fix this by gently bending the metal in the right spot. Now, when I press down on the metal, it stays in place with a little click, and I can pop it back out with tweezers.
I also noticed that a small gold-colored spring protrudes from the movement; only when I press down on this spring does the AC reset function and the watch start running. The second hand moved for about 10 seconds, and pressing the side pushers lit up different segments. I could even hear the ticking if I held it close to my ear. However, as soon as I released the spring, the watch stopped. This spring is supposed to touch the metal case back when the watch is closed, so I thought there might be a grounding issue.
As I was thinking about this and testing the watch, I noticed a small metal plate that was bent downward from the top and could have touched a gold-plated contact point, but it wasn’t making contact. I pressed it down with a toothpick, then performed an AC reset again, and the second hand started moving smoothly. Since I didn’t have to press the spring this time, I surmised that when I pressed the spring, the upper metal plate bent so much that the downward-curved tab made contact with the gold-plated point. As soon as I removed the toothpick, the second hand stopped, and the visible segments on the LCD also dimmed. So instead of using wires, this is how the electrical connection is made.
Fixing this was pretty straightforward: first, I cleaned the small metal tab and the gold-plated contact it was supposed to touch. Then, using tweezers and a toothpick, I bent the small tab downward a bit more.
Next came the AC reset — I didn’t have to press or hold anything manually anymore; the second hand started moving, and the LCD segments came to life.
I screwed the case back on, just in case it exerted extra pressure on the movement or needed to make contact with the small gold-colored spring. Of course, the LCD segments’ display didn’t improve.
Preparing to Take It Apart
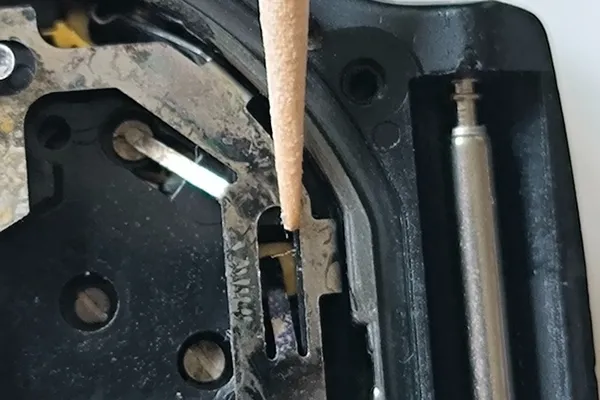
I removed the case back again and cleaned the top metal plate a bit, which revealed some more markings. This time I found the word “PUSH,” which will come in handy when removing the crown — it tells me which spot to press to pull it out.
Since I was already working on removing the crown, I took a closer look at the altitude sensor’s ribbon cable on the right side and how it’s connected. The cable goes under a small plate held in place by a small plastic pin at each of the two notches on the edges, and secured in the middle by a screw. Once the screw is removed, you can probably just lift this plate up, and the sensor’s ribbon cable will come free. You probably won’t need to touch anything on the outside, because the sensor remains attached to the case, and only the movement comes out.
I have a cheap Chinese watch repair kit with a movement holder that has a hole in the center. I figured that if I removed the movement from the case and clamped it upside down, the hands would drop into this hole. So I first wanted to set the hands to the 5:30 position, but then I realized that this would cover the LCD display, so I set them to the 12:00 position instead.
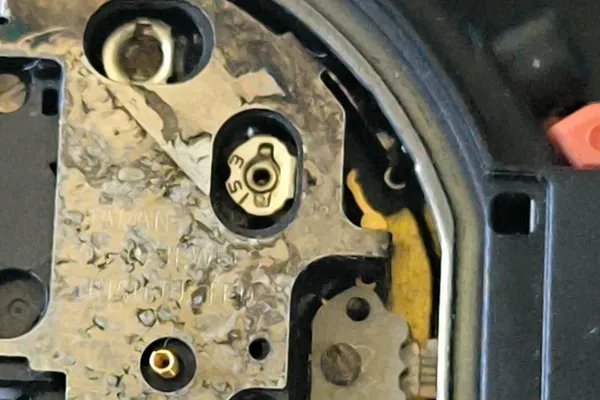
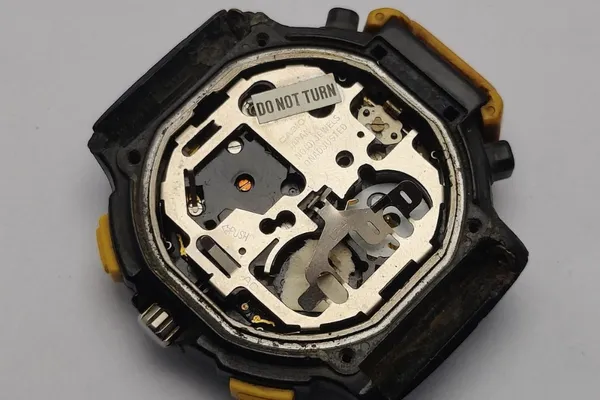
Meanwhile, I found a picture online of a watch where the inscriptions on the top metal plate — as well as a sticker — were perfectly visible. I was able to make out the following inscriptions, which I hadn’t noticed before:
- “DO NOT TURN” sticker: the screw used to calibrate the sensor is located underneath this; obviously, this is not something you want to start adjusting
- <= PUSH: The arrow points to the spot you need to press to remove the crown
- CASIO: the manufacturer
- JAPAN: the place of manufacture
- NO (0) JEWELS: the movement has no jeweled bearings
- UNADJUSTED: The movement has not been adjusted for positional variations or extreme temperatures.
As a point of interest, I’d like to draw your attention to the piece of paper with ragged edges placed at the bottom of the left battery compartment in the photo — it probably doesn’t belong there. Also, note the insulating pad at the bottom of the right battery compartment; it looks like it has fallen out of place as well.
In another photo of a different watch, the fallen insulating pad was left at the bottom of the battery compartment, and a small plastic rectangle was glued to the metal base. I find it strange that there are so many examples of “incorrect” solutions in the photos I’ve found of these watches.
After seeing this, I became even more certain that my solution is the right one (1 insulating pad on the inner metal side above the right battery compartment).
Finding a Brand-New Original Strap
A little detour. When the watch arrived and I saw it for the first time, I was bothered by the fact that it didn’t have a strap.
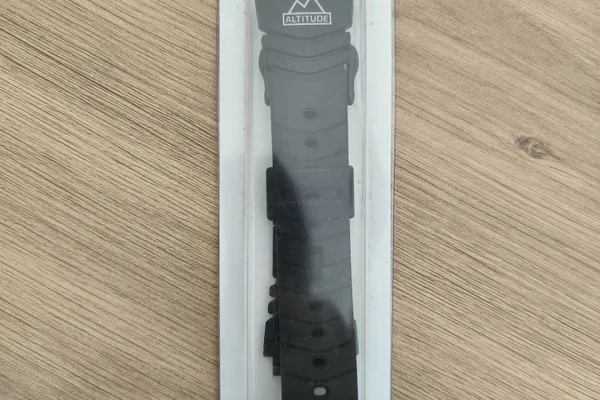
I didn’t think twice — I immediately started searching eBay to see if they sold an original strap for it. After all these years, I didn’t think I’d find a NOS strap in its original packaging, but I did — from the eBay seller essenzial watch / watchbandman75. I really liked it — the “altimeter” inscription and the mountains look simply brilliant on it. Needless to say, I ordered it; it was about 4,000 HUF (~$10.50). So far, I’ve spent ~8,000 HUF (~$22) on the watch and the original strap, and 5,000 HUF (~$14) on batteries. 13,000 HUF (~$36) in total.
Even if the LCD doesn’t work, I’ll probably be able to sell it for what I’ve spent so far. At least that’s how I’ve been reassuring myself.
Removing the Movement
Back to the repair. Using the markings as a guide, I had a plan for removing the movement, but I let the watch run for a few more days.
The analog movement was running surprisingly accurately, with only a minimal delay. Different segments appeared on the LCD display as time passed. When I switched to stopwatch mode, different segments became active. Perhaps this indicated that the microprocessor was functioning properly, and the LCD display might not be that badly damaged after all. It’s possible there’s just a contact issue.
No excuses — I have to take it apart again, and this time do a much better job.
I slipped the fingers of a rubber glove over the tips of my fingers. I started by disconnecting the sensor; I found my smallest-headed screwdriver and a magnifying glass. I unscrewed the screw and set it aside. I used tweezers to lift the small plate — which turned out to be metal — off the plastic pins. What a clever solution! There are cutouts on both sides of the ribbon cable, which are held in place by the two plastic pins. At the top, there are four small bumps that fit into the four small holes at the bottom of the metal plate. This ensures proper positioning and pressure. Using tweezers, I very carefully lifted the ribbon cable off the two plastic pins. Detaching the sensor was easier than I thought.
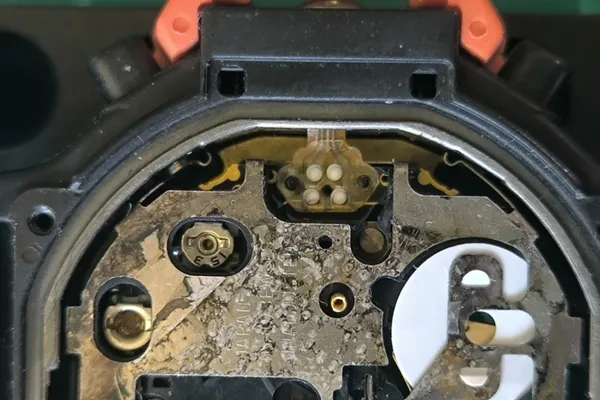
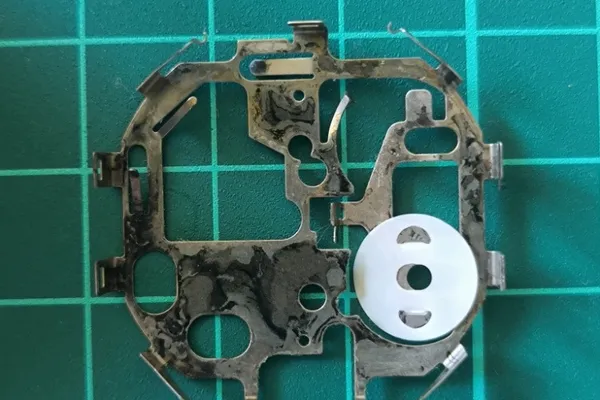
Next came the removal of the crown, which was even simpler. I simply pressed down on the correct spot with the thin metal pin punch included in the watch repair kit and pulled the crown out. I moved the ribbon cable out of the way and lifted the movement out of the case, starting with the side facing the crown. The movement was held in place at five points by a metal plate extending from the top. I popped these points loose with tweezers and a toothpick, and then the metal plate came off. The inside of the metal plate was also terribly discolored. I gave it a thorough cleaning with isopropyl alcohol, with similar results to the other side.
Removing the LCD
Then I started examining the movement to figure out how I could access the LCD. All I could determine was that the movement had a sandwich-like structure, so it had to come apart somehow.
There was one thing, however, that I really wanted to avoid: the fragile little hands coming loose. I didn’t have any special tools for removing and reinstalling them. I really hoped I could access the LCD without the hands and dial coming loose. I tried using a guitar-pick-like piece of plastic to separate the layers, but it turned out to be too thick. Then I tried the same thing with my fingernail, and I was able to get it between the layers. I pried a little on one side, then the other, and then what I’d been afraid of happened. The dial simply fell off, pulling the hands with it, which landed on the table. I immediately panicked and thought there was no way I could put this back together properly, so I started calculating again how much I could sell the watch for in this condition. But there’s no point in panicking — it leads nowhere.
I examined the movement without the dial and saw that the LCD was accessible. All right, then, let’s see how to remove it. It’s held in place by a plastic tab in the center at the top — that’s what I needed to pull. I very carefully pulled the tab with a toothpick while trying to lift the LCD with another one. It popped right out of place, and fortunately, I didn’t cause any damage. What did I find underneath? An elastomer connector (also known as a ZEBRA connector) sitting on gold-colored PCB traces. First, I pulled the ZEBRA connector out by its center. Then I cleaned both the traces and the ZEBRA connector with IPA. I was extra careful with the ZEBRA connector — I didn’t want to damage it, so I just very gently cleaned the bottom and top. To be honest, I didn’t see any serious dirt on those parts.
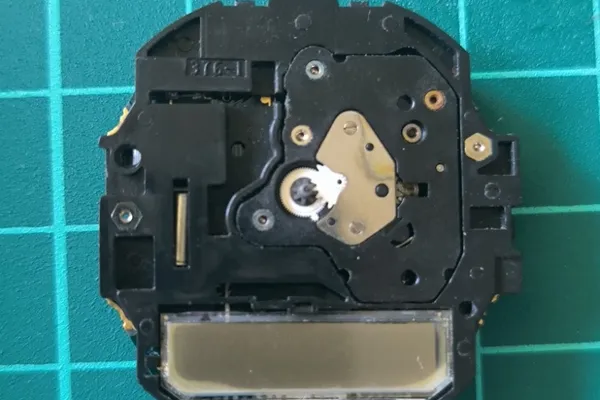
Time for the test: ZEBRA connector back in, LCD back in, metal plate on top of everything, batteries in. Absolutely nothing had changed compared to its previous condition.
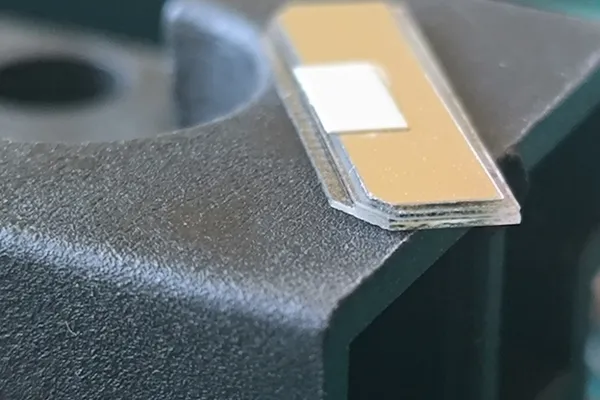
I took it apart again so I could focus on the LCD. The back, where it contacts the ZEBRA connector, is L-shaped; the connector fits into this slot, and there are tiny conductive strips (Indium Tin Oxide — ITO) on it. These strips weren’t all the same color, so I cleaned them — their color didn’t really change. I put them back in and checked; the same segments were active. Next, I flipped the ZEBRA connector over to rule out a fault with it. No change. I flipped it again — same result. I tried pressing the LCD with my finger in different places to see if the contact was the problem, but still nothing changed. I took a closer look at the LCD’s conductive strips. Some were faint, and some had completely disappeared.
I started to think that the leaked battery had done its job here too, eroding or wearing away a few strips.
Reassembly with makeshift tools
There was nothing else to do, so I set about putting the watch back together. Just as I thought, I got stuck when it came to putting the hands back on — I didn’t have the right tool for the job.
Well, then I’d have to make do with something else. So I grabbed a pen and removed the refill. That left me with two tubes of different sizes, each with a hole in the middle: the pen itself and the end of the refill. Using tweezers, I carefully aligned the hands to the 12:00 position, then applied vertical pressure with my makeshift hand presser. Afterward, I pressed down on the center of each one with a cotton swab as well. Needless to say, the seconds hand was by far the hardest to deal with — even gripping it and positioning it in place took a serious amount of effort. But I finally managed it.
I put the movement back into the case and pressed the crown into place. I quickly put the ribbon cable back in place and secured it using the small positioning pins, bumps, and indentations. And then another unfortunate thing happened: when I grabbed the gold-colored spring with tweezers, it popped out. It didn’t land on the white table — it fell to the floor. I couldn’t see it on the hardwood floor — it must have fallen onto the rug — so there was no way to find it.
I remembered a trick: you’re supposed to place a flashlight on the floor and shine it horizontally across the floor, so that objects on the floor cast long shadows. It was worth a try.
And I was lucky enough that the spring hadn’t fallen on the carpet but on the hardwood floor, and I found it in half a minute.
I put it back in its place, this time sticking a toothpick into the top to hold it in place.
What next?
The watch was only half-working, so I had to decide what to do next. It really bothered me that I couldn’t figure out what was wrong with the LCD.
I tried one more thing: I pressed the START/RESET pusher and watched what appeared on the LCD:
- default state: two vertical segments stacked one above the other on the right side
- START/RESET pusher: two horizontal segments vertically stacked on the right side
- Pressed the START/RESET pusher again: it returned to the default state
Well, that didn’t tell me anything about the problem. There was another state right after assembly, but I couldn’t reproduce it. In this state, an “L” shape was also visible in the middle, above a horizontal segment.
Apparently, the two pushers on the left and the top-right pusher didn’t do anything; this might be because the movement inside the case shifted during or after assembly, putting it in the wrong position relative to the pushers.
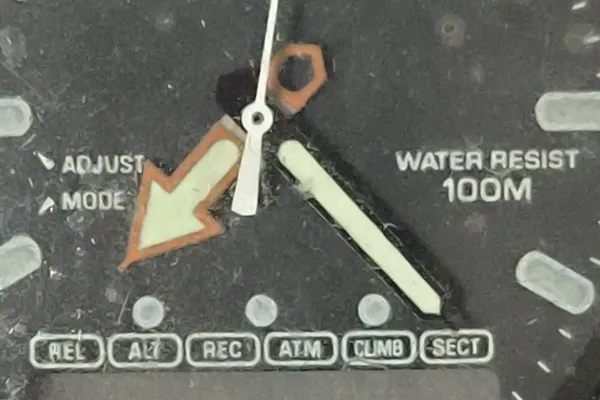
Troubleshooting with Another Breakthrough
I started searching for LCD displays for the watch on eBay. Since I’d already been amazed that an original strap was available, I figured, why couldn’t there be an LCD for it too?
I actually found a NOS replacement LCD for 6,000 HUF (~$16.50). Unfortunately, shipping would have cost almost as much. That would have cost more than the watch and the strap combined. On top of that, I wasn’t sure if the LCD was actually the problem, or if it was the microprocessor or something else. It would have been cheaper to buy a new ZEBRA connector and test it with that, or I could have somehow measured the LCD’s conductive traces with a multimeter. Of course, for either option, I would have had to completely take the watch apart again. I’d also have to remove the hands again. It was too much to even think about. Instead, I searched forums for posts about faulty ZEBRA connectors. Here’s what I found regarding defective LCDs and/or ZEBRA connectors:
- Insufficient pressure: the LCD and ZEBRA aren’t connecting properly
- Incorrect position: the ZEBRA connector is misaligned or twisted, which can cause missing segments
- Material aging: over the years, the material of the ZEBRA connector wears out and shrinks, which also causes connection problems
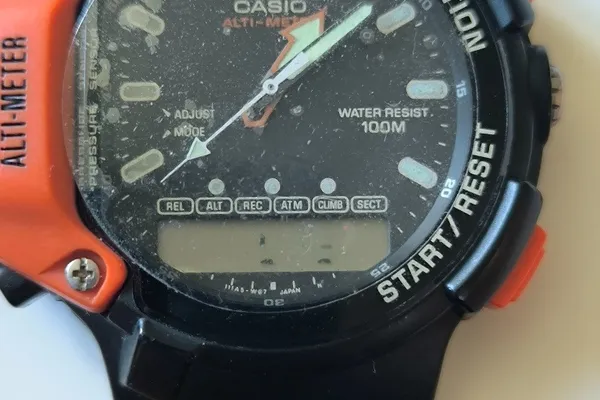
Based on this, I figured the LCD was fine and the ZEBRA connector was faulty. Maybe I hadn’t cleaned it properly. I sent the AI a macro photo of the ZEBRA connector, where the center is bent out and clearly visible. The verdict: it’s in perfect condition. The solution: raise the ZEBRA connector. At that point, I gave up on this line — I didn’t want to start hacking away at it. Instead, I looked at the close-up photos of the LCD and noticed that there were brighter areas around the edges, and a vertical black stripe on the right edge. I should have noticed this when I took it out. This defect was likely caused by time and battery leakage as well; the fluid seeped between the layers.
I tried again, just in case the problem was simply improper pressure. I removed the case back of the watch and pressed down on the movement above the batteries; the LCD went completely dark, and the hands stopped moving. When I applied pressure in different spots above the LCD, some segments became darker while others faded. Some went completely dark, while others became active. Sometimes it didn’t respond when I pressed the pushers, and the analog hands also stopped moving. Well, that didn’t get me much closer to a solution either. I stopped testing and needed to think the situation through.
When I put the case back on, I noticed the strange position of the movement spacer ring. Up until then, I had always put it back exactly as I had found it originally in the case. The cutout was above the altitude sensor, but the other side was positioned slightly higher. An upward-curved metal plate was pushing it up, which didn’t make much sense. Why would the movement inside the case have shifted in such a way that the pushers wouldn’t work with the case back closed? The only explanation was that the spacer was in the wrong position.
I rotated the spacer 180 degrees and screwed the case back on. When I pressed the MODE pusher, I realized for the first time that the watch hadn’t been making any sound until then! But now it was beeping, and all the pushers were responding properly. Another victory.
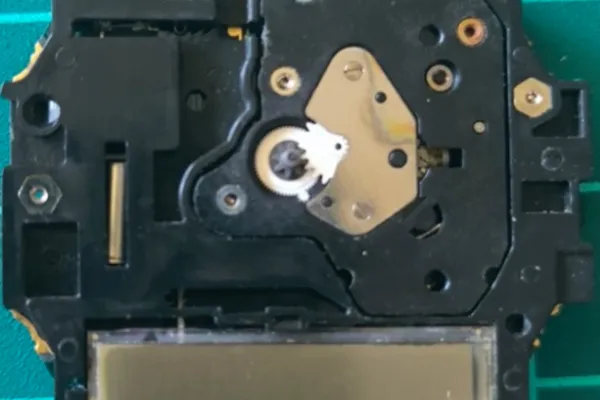
LCD Testing
It occurred to me that since I’d found the user manual for the watch and pressing the pushers activated different segments, I could use that information to figure something out.
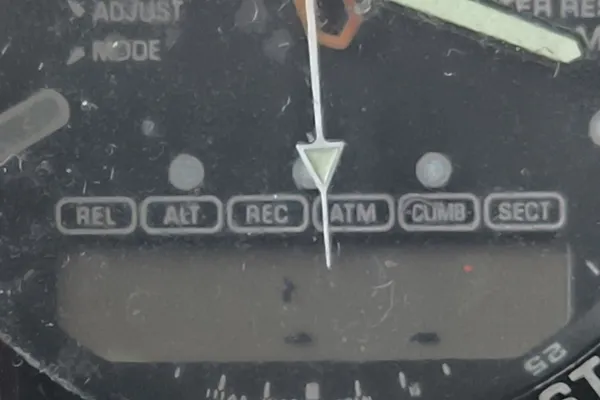
It was time for another task tailored to the AI. I fed it the manual, so it knew what each pusher did and what the LCD displayed. Then I took a photo of the current state, pressed the MODE pusher, took another photo, and so on. The modes cycle through the following sequence: Timekeeping mode → Altimeter mode → Altitude Differential mode → Data Recall mode → Barometer mode → Stopwatch mode → Alarm mode → Timekeeping mode. In Timekeeping mode, you can use the START/RESET pusher to switch between the time and date displays. I took pictures of the following states:
- Default state (Timekeeping) time and date mode: on the right side, either 2 vertical or 2 horizontal segments stacked one below the other
- Altimeter mode: 2 horizontal segments one below the other in the center, 1 horizontal segment on the right
- Altitude Differential mode: one horizontal segment in the center and one on the right
- Data Recall mode: no active segments
- Barometer mode: 1 horizontal segment on the right
- Stopwatch mode: one vertical and one horizontal segment stacked one below the other in the center, one horizontal segment on the right
- Alarm mode: 1 horizontal segment each in the center and on the right
What did this test reveal? Most likely, the microprocessor is working properly, which was good news. Several of the segments in the center and on the right were working, but I haven’t seen any active ones on the left yet. Since the display changes the most in Stopwatch mode, I decided to test that as well. During the measurement, some segments turned off, while others dimmed. When I stopped the measurement, the changes stopped. After a reset, I saw the default state. I didn’t see any more active segments in this test than in the previous ones. I checked the user manual to see in which modes the LCD should definitely display something on the left side as well. I tried everything. What stood out the most was that there should have been a mode indicator bar at the top, but that wasn’t visible either. In Altimeter mode, I should have seen a flashing “m” on the right edge, and in Barometer mode, a flashing “mb” on the left edge — but I saw none of these. I went back to the conclusion that the problem must lie with the ZEBRA connector, so I dug a little deeper into the matter. Let’s take a closer look at exactly what these ZEBRA elastomer connectors are and how they work.
“The connector consists of alternating layers of conductive silicone and insulating silicone that have been vulcanized. This material not only provides stable and reliable performance but is also easy and efficient to manufacture and assemble. They are primarily used to connect the liquid crystal display to the driver circuit board in the LCD module to ensure unimpeded signal transmission between the two. Advantages: Good weather resistance, impact resistance, repeatable disassembly and adjustment, moisture resistance, and corrosion resistance.”
Another important point is that multiple conductor sections — typically 3 to 4 — can simultaneously contact the conductive traces on both the PCB and the LCD. Based on this, even if the ZEBRA connector in the watch had been twisted or wasn’t making contact at every point, the display should still have worked. Since I was completely at a loss as to what to do next, I started bouncing the problem back and forth between different AI models, comparing their theories and repair suggestions.
There were some promising theories, but I began to feel more and more strongly that there was only one solution: replacing the LCD.
New Original LCD
I went back to the eBay page I’d found earlier (dimarrelojeros / dimar2018). I found LCDs that looked identical, but with different prices and names, which confused me a bit.
They were likely created for different countries, which is why their names started with German “Ersatz,” English “Replacement,” and the general term “Vintage original.” However, their part numbers matched: QW-733 LCD QW-734-01, and the same image was uploaded for all of them. I translated the original Spanish description to make sure I’d found the right LCD. Here’s what I found:
- Brand-new, never-used LCD
- May have minor scratches where they came into contact with other LCDs
- MPN (Manufacturer Part Number): QW733
- Country of Origin: Japan
- Compatibility: QW-733 and QW-734-01 layouts
- About the seller: They’ve been in the watch business since 1981, with a 99.9% positive rating and 30,000 products sold
Based on this, the seller and the LCD seemed truly reliable, so I ordered the listing with the German description. All I had to do was wait for it to arrive. I was really hoping it would arrive as soon as possible, because if I managed to replace it in time and it worked, I’d be able to test the watch in real-world conditions in the Austrian mountains.
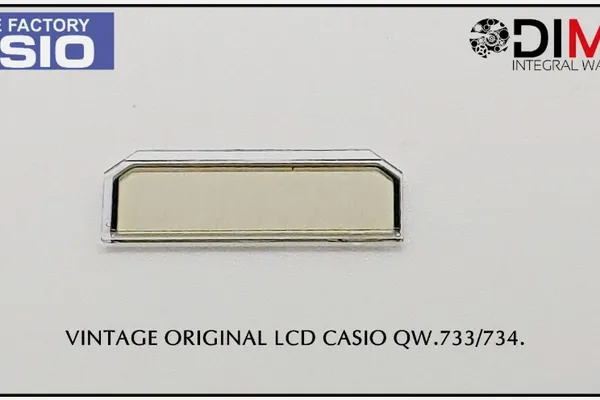
I finally got lucky — it arrived at the very last minute before I was set to leave, so I quickly took the watch apart, removed the old display, and placed the two side by side. Without shining a flashlight on them, I couldn’t see the difference yet, but once I illuminated them with my phone’s flashlight, the difference was immediately obvious: the new LCD has a gold-tinted polarizer. That was probably what the “-01” suffix in its model number referred to. Honestly, the color didn’t matter at all — I was only interested in one thing: getting it to work.
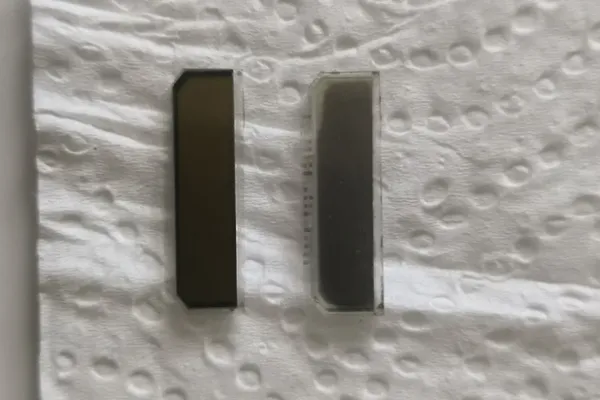
I soaked the ZEBRA connector in IPA — this time I didn’t go easy on it — then put it back in place, and the LCD went back into place as well. One small detail I haven’t mentioned yet: at first, it was pretty difficult to insert the LCD so that its L-shape would fit over the ZEBRA connector. After taking it in and out a few times, I realized that all I needed to do was push the tip of a toothpick between the layers of the “sandwich,” press down on the ZEBRA connector a little, and suddenly there was enough space to fit the LCD comfortably and securely so that it sat right on top of the ZEBRA.
I put the metal plate back on the movement, inserted the batteries, performed an AC reset, and lo and behold, the new LCD worked perfectly — the active segments were crystal clear.
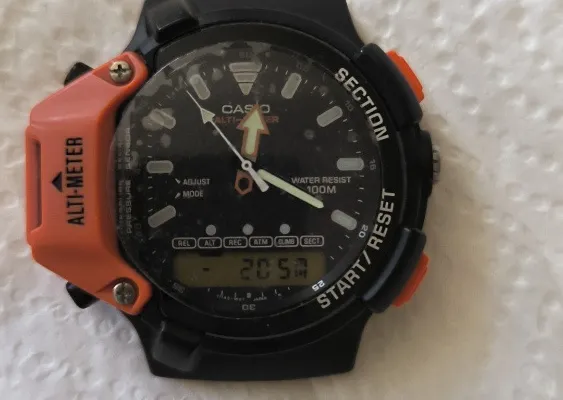
It was a touching moment after all that trial and error. I put the movement back in place, screwed the case back on, and immediately ran a sensor test indoors. The altitude sensor read 205 meters, and the barometric pressure sensor read 1,030 mb. Compared with online data, the altitude reading was off by a few tens of meters, and the pressure reading by a few millibars, but I still had to wait a little longer for the final test.
Struggling to Install the Strap
First, I had to attach the strap. I thought this would be a quick 2-minute job, since I even had the right tool for it.
I was dead wrong — one side of the spring bar always snapped into place immediately, but when I tried to snap the other side in, it simply wouldn’t go in. It’s unbelievable, but it took me 1.5 hours to finally adjust the strap to a position where the other end of the spring bar would snap into place. During this process, the lugs of the case got a few tiny scratches from the spring bar, but fortunately, they’re in an inconspicuous spot.
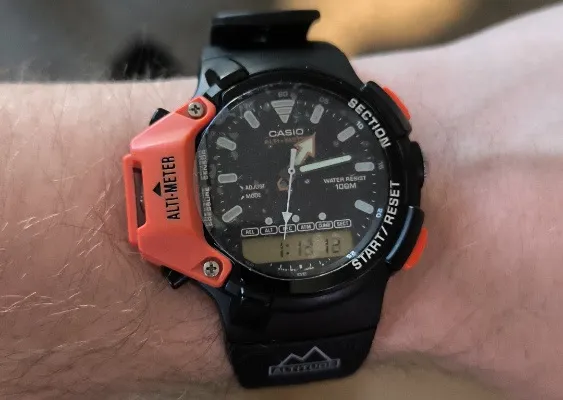
Once I was done with the strap, I could finally put the watch on my wrist.
Since the case is in very good condition, I decided not to remove the screen protector until the end of my trip to Austria — no matter how ugly it is, at least it provides protection.
A Real-World Test in the Alps
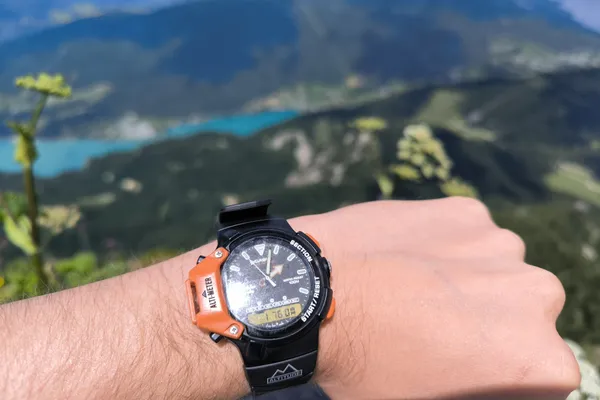
The big test finally arrived; I wore the watch even on the drive there, and checked the altitude and air pressure readings at every stop.
Up to a few hundred meters in altitude, I didn’t notice any major differences compared to the data on the map. Then, around 600–700 meters, it started giving completely inaccurate readings. At our lodging, located at ~1,000 meters, I had time to read the manual, which mentioned that the altitude needs to be recalibrated from time to time. Here are some excerpts from those sections:
“This watch estimates altitude based on air pressure. This means that altitude readings for the same location may vary if air pressure changes. (…) The altitude measurements produced on this watch may be affected by atmospheric pressure. Because of this, we suggest that you calibrate the altimeter using information available from a map or other source. (…) When you are out hiking or mountain climbing, calibrate the altimeter using an altitude value from another source (a signpost or map, for example). Do this just before you start your altitude measurements. 1. At Point A, calibrate the altimeter to 400 meters. 2. Proceed from Point A to Point B, taking altimeter measurements along the way. If you also have altitude data for Point B, you should recalibrate the altimeter there. Be sure to recalibrate at Point B if changing weather conditions cause errors in the altitude readings. The following conditions will prevent you from obtaining accurate readings: When atmospheric pressure changes due to changes in the weather; extreme temperature changes; or when the watch itself is subjected to strong impact.”
This was great news, because it meant there was hope that the sensor was working properly after all. Following the instructions, I calibrated the watch at 1,000 meters. The next day, I took a train up to an altitude of ~1,700 meters, and it tracked the change in altitude accurately throughout the trip. There were no problems on the way down either; it measured just as accurately. Over the next few days, I tested it at ~1,800 meters, and it displayed the altitude values accurately, with a maximum deviation of 5 meters. Our last big trip took us to ~3,000 meters, where the temperature was also much lower. Here, too, it displayed the altitude fairly accurately, but I recalibrated it just in case, since the manual recommended doing so.
I think I can safely say that I’ve fully restored the watch. The fact that I was able to test it in real-world conditions was just the icing on the cake.
Screen Protector
After returning home from the Alps, there was just one thing left to do: replace the screen protector. Because of the altitude sensor, the protector needs a slightly non-circular shape.
Since the previous one — which was 30 mm in diameter — didn’t cover every part of the screen, I measured the diameter of the watch crystal with a Vernier caliper. It was around 35 mm, so I figured a 33 mm diameter hydrogel screen protector would be sufficient. This way, it won’t hang off the crystal, and there’s still room for it to expand in warmer temperatures. I wanted to buy several pieces because I wasn’t sure how well the cutting would go. So I ordered a 3-piece set from a Polish online store.
While I was waiting for the film to arrive, I started making the template. I temporarily removed the old film and stuck some Tesa masking tape — the kind used for painting — onto the crystal. I traced around the edges with a pencil, then removed the tape and stuck it to the white tabletop. The resulting shape was surprisingly precise — I could have used it as is. But I wanted a more accurate template that I could reproduce multiple times. I placed a soft measuring tape under the masking tape on the tabletop, then took a photo of it with my phone.
On my computer, I opened the photo in Inkscape and used the scale visible in the image to set the photo to the correct size. This way, 1 mm in the photo corresponded to 1 mm in the software. I drew a circle that fit exactly to the shape visible in the photo; its exact size was 34 mm. Next, I traced the lower half of the part facing the sensor using the Path tool, as that seemed more accurate. I then duplicated and mirrored this section, resulting in a completely symmetrical shape. All that was left was to merge the shapes and the circle into a single figure. Since the protective film has a diameter of 33 mm, I scaled down the shape, and my template was ready. I saved it as a PDF with three shapes on the page: two with black borders and a transparent interior, and one that was completely black. I opened the saved PDF and checked the template’s width and height: 29.6 x 33 mm. Perfect. The dimensions were still correct after printing, so I cut out a template with a border using a small pair of scissors. It looked good when I tried it on the watch.
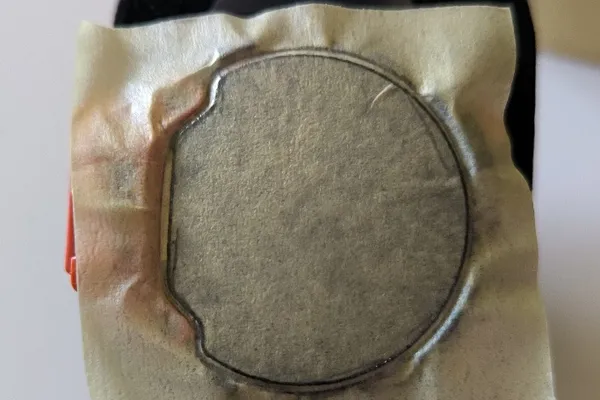
Meanwhile, the screen protectors arrived. Each screen protector consisted of the following layers: a white sheet, a non-sticky transparent layer, the screen protector itself, and a top protective layer. I took one of the three protectors and carefully secured it to a cutting mat. Then I secured the cut-out paper template on top of it. Since I had to cut through four layers at once, I used a scalpel to cut through all layers. Then I removed the template and the film from the cutting mat.
Next came the application. I removed the old film again and thoroughly cleaned the mineral crystal with IPA. Unfortunately, tiny scratches and cloudy spots became visible on the crystal, so it was clear that the protective film hadn’t been there from the beginning. After I successfully applied the new film and peeled off the top protective layer, I noticed that the film was opaque. I thought there might be an adhesive residue on it, since it became clear when I applied IPA, but turned opaque again after the IPA evaporated. I checked the label on the screen protector packaging and realized I had accidentally ordered a matte screen protector.
I placed a repeat order for film from the same manufacturer, but this time I made sure to specify that the film be completely transparent. When the new film arrived, I removed the old film, cleaned the surface, cut the new film to shape again, and applied it. I wasn’t entirely satisfied with the result, but unless I looked at it up close, the transparency made the minor visual imperfections almost imperceptible.
It will still do its job perfectly, and that’s what matters.
Final Thoughts
I haven’t adjusted the time on the watch since I assembled it. Both the analog and digital sides run about 1 minute fast per month.
This surprised me, since the analog part was initially running slow. I thought the watch would run slow because of that. However, the analog and digital timekeeping have stayed within one second of each other ever since.
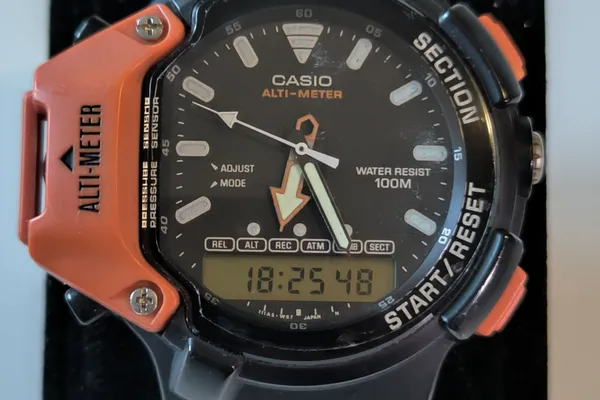
All things considered, and looking back on this whole watch restoration adventure, I think the project was a success.
I’ve abandoned my initial plan to sell the watch. It’s now part of my collection, and when I go hiking in the mountains, it will be my number-one companion.
- Watch: 4,150 HUF (~$11.50) (+1,690 HUF / ~$4.70 shipping)
- Batteries: 5,000 HUF (~$14.00)
- Original NOS strap: 3,800 HUF (~$10.50) (+3,500 HUF / ~$9.70 shipping)
- Original NOS display: 6,400 HUF (~$17.50) (+5,900 HUF / ~$16.40 shipping)
- Screen protector: 2,025 HUF (~$5.60) (+790 HUF / ~$2.20 shipping) ────────────────────────────────────────
- Total: 21,375 HUF (~$59.10) (+11,880 HUF / ~$33.00 shipping)